Wednesday, September 26, 2012

Party Hats

Personal touches to every party just gives a wow factor. Making the party hats is not hard so why not jump right in and do them yourself!! 

Materials Needed:
Poster board
Scrap book paper
glue gun and glue sticks
Elmer's glue stick
hole puncher
Hat template
Things you want to make the hats personal (such as: pompoms, stickers, ribbon)

Make your hats:
1.  Go to this site and print off the the template for your hat.  http://ohhappyday.com/2011/02/party-hats-diy-template/   I did it on  card stock so it was stiff for tracing.  Once printed cut out the template and begin to trace onto the poster board.  Make as many as you will need.
2.  Trace the template onto the scrapbook paper also.  Cut out all the hat forms from poster board and paper.
3.  With your glue stick, glue paper onto the card board templates.  Allow to dry for at least 15-20 minutes.
4.  Plug in your glue gun to warm up.  Once hot it is time to put together.  I held the two edges of the hat with one hand and glued with the other.  Just put a line of glue down one edge and then put them together. 
5.  Once all the hats are glued together, use the hole puncher to make one hole on each side for the ribbon.
6.  Decorate your hats!!! 
The children at our party had a great time putting on their hats!!!


Monday, September 24, 2012

Pink Party Punch

At every kids party you need a great punch.  This punch has been a hit at my last couple parties so I wanted to share it with you.  Every girl needs a pink punch to make her party a hit.  At my little girl's party we went through two batches of this yummy stuff!!!


Pink Lemonade Punch
1 can frozen pink lemonade concentrate
1 2liter bottle of Sprite
1 container of Raspberry sorbet
 
1.  Make the pink lemonade as instructed on the can.
2.  Allow the Sorbet to sit out for a little while so that it is easyer to scoop.
3.  In the punch bowl mix the lemonade and sprite.  Then add the sorbet in small spoon fulls.


Friday, September 21, 2012

Caramel Apple cupcakes

HAPPY FALL!!!
Today is the first day of fall in 2012. 
I have been waiting for this day for weeks now.  Fall tends to be my most favorite time of the year.  The cooler but not cold weather is so wonderful!!  The only thing I hate about fall is that nature begins to go into hibernation and then comes on the ugly winter. With that aside there are so many good things about fall.  The changing of the colors, Apple cider, pie, pumpkin patches, corn mazes, and many other great things.
I wanted to start this fall off right with a Caramel Apple cupcake, YUMMY!!
The recipe is from the cook Book : Crazy about Cupcakes

Apple Cupcakes               Oven at 350 degrees F
1 1/2 cups Granny Smith Apples, peeled and grated
1 tablespoon Brandy (do not have to use) replace with Lemon Juice
1 1/4 cups all-purpose flour
3/4 cup granulated sugar
1 teaspoon baking soda
1/2 teaspoon salt
1 teaspoon ground cinnamon
1/4 teaspoon nutmeg
2 large eggs
1/2 cup vegetable oil
1 teaspoon vanilla extract

Extras
1 bag of traditional caramel candies
Caramel sauce
Butter cream frosting

Making the cupcakes
1. Preheat oven to 350 degrees F, put cupcake liners into pan ( now I have a special pan for this cupcake.  In the base of the cupcake pan there are spikes which are used to hold the caramel candies down.)
2.  In a small bowl combine grated apples and brandy or lemon juice, set in fridge until ready to use.
3.  In a separate bowl combine the flour, sugar, baking soda, salt, cinnamon, and nutmeg.  Mix well together.
4.  Add the eggs, Veggie oil, and vanilla extract and mix until well combined.  Add the apple mixture and mix again.

For a normal pan:  Fill the cupcake liners 3/4 of the way.  Unwrap caramel candies and push into the middle of each cupcake.  Bake for 15 mins.
For the pan I have:
Place liners over the spike and fill with batter only a little bit into the base of the pan.  See picture:
 
Now unwrap caramel candies and press down onto the spikes.  These spikes help hold the candy in the middle of the cupcake.  Once candy is in place, cover with more batter.  Place into oven and bake for 15 mins. 
When the timer goes off remove from the oven and allow to cool completely.  Make your Butter Cream frosting recipe.  I have not found one that I love yet so I will not share one just yet here.
Fill a gallon zip lock bag with frosting, press to one corner and make into a piping bag.  Cut off the corner and  pipe onto the middle of each cupcake.  Then take a small spoon and make a hole in the middle of the frosting.  Fill with caramel sauce.
Then you are ready for the first part of fall!!! Go have a wonderful and blessed fall 2012!!!


Olivia the Pig Cake and cupcakes

Olivia the Pig loves red and therefore I had to make red velvet cake for the Birthday party.  But I wanted to elevate the cake some how because I find red velvet a bit boring.  I found a blogger that had a red velvet cake with cheesecake inside.  This was such a great idea therefore that is what I made and it turned out so yummy!!!!


Recipe by Browneyedbaker.com

Prep time: 1 hr. (active) 8 hrs. (inactive)  /bake time 1 hr. 20 mins.

Cheesecake
32 ounces cream cheese (at room temperature)
1 1/4 cups granulated sugar
4 eggs (at room temperature)
3/4 cup heavy cream
1 tablespoon vanilla extract

Red Velvet Cake
1 cup unsalted butter (at room temp.)
1 1/2 cups granulated sugar
2 eggs
1/2 cup + 1 tablespoon unsweetened cocoa powder
6 tablespoons red food coloring (liquid)
1 teaspoon vanilla extract
1 cup buttermilk
2 1/4 cups all-purpose flour
1 teaspoon baking soda
1 teaspoon salt
1 tablespoon distilled white vinegar

Making the cheesecake:
1. Preheat oven to 350 degrees F.  Now prep your pans:  I wanted my cheesecake for the cake to be the same size so I used the actual cake pans then for the cupcakes I put remaining cheesecake batter into a small casserole dish.  Spray the bottom and sides of all pans with oil.  Then put a piece of wax paper in the base of all the pans.  This will help the cheesecake not to stick and all come out without problems.
2.  Using an electric mixer, beat together the cream cheese and sugar at med until completely smooth, about three mins.  Add the eggs one at a time, beating for a min. or so after each addition.  Scrap down the sides of the bowl as needed.  Add the heavy cream and vanilla extract and beat until completely incorporated.
3.  Pour the batter into the cake pans first and then the small casserole dish.  Make sure the top is smooth and even.
4.  Now you will need casserole dishes large enough to hold your different pans.  Put a cake pan with the cheesecake already in it, into the empty casserole dish.  Fill a cup up with very hot water and add it to the base of the casserole dish.  Fill till it is about half way up the cake pan.
5.  Place the water bath and cheesecake mix in the oven.  Bake for about 50 mins. Once time is over turn off oven and allow pan to sit in the oven for another hour with out the heat on.   Take out of the oven and place on a cooling rack to cool till room temp. 
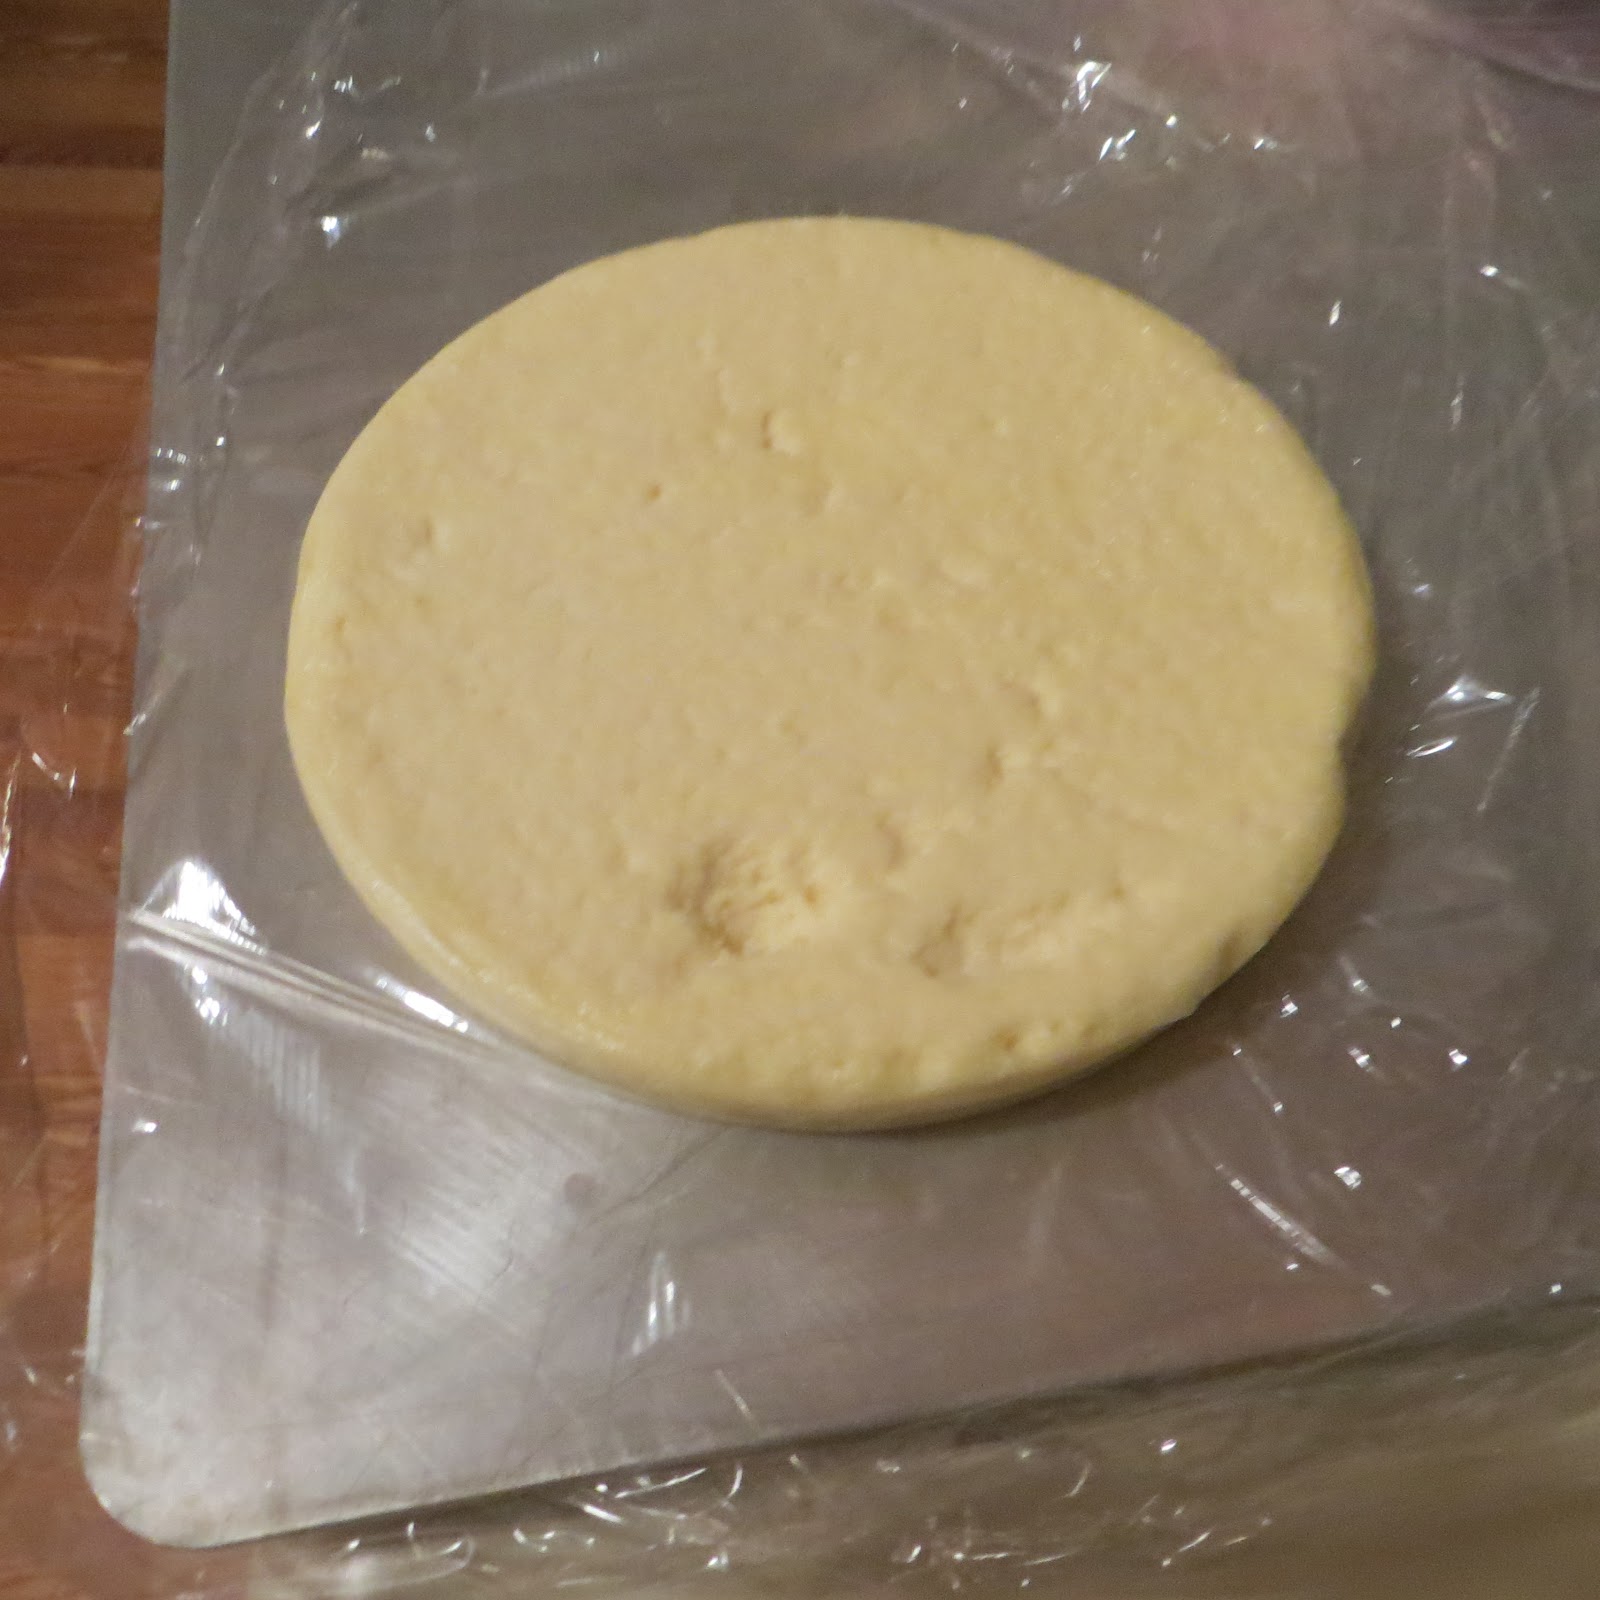
6.  I took a large cookie sheet and covered with wax paper once the cheesecake is cooled the cake pans over onto of cookie sheet to get out the cheesecake round.  The cheesecake for the cupcakes I left in the casserole dish, put everything into the fridge for at least four hours or overnight.
cheesecake round


Making the red velvet cake:
1.  Preheat oven 350 degrees F.  Grease cake pans and line bottom with wax paper.
2.  On med.-high speed, cream the butter and sugar until light and fluffy, about 3 mins.  Turn the mixer on high and add the eggs one at a time.
3.  In a separate small bowl mix together the cocoa powder, vanilla, and red food coloring to make a thick paste.  Add to the batter and mix on med. speed until completely combined.  Scrape sides and bottom to make sure all batter is well mixed.
4.  Reduce mixer to low and add half of the buttermilk and then half of the flour.  Repeat until completely mixed.  Beat on high until smooth. 
5.  Add the salt, baking soda, and vinegar and beat on high for about 30 seconds.
6.  Fill cake pans and fill cupcake pan with the remaining if you are making cupcakes.
7.  Place into oven and bake for about 30 mins.  Remove and allow to cool for about 15 mins. and remove from the pans.

Once cheesecake is cooled for about 4 hours and cake is completely cooled it is time to stack and decorate how ever you wish.  Remember you need to level both cake layers, the side you trimmed have it on the inside of the cake so when you go to frost you will not have crumbs in the frosting.  The picture below is how the cake should look.
Cake/cheesecake/cake

For the cupcakes  I used a small round cookie cutter to cut out the middles of the cupcake and also used it to cut the rounds on the cheesecake in the casserole dish.  This was messy but I wanted the hole to be the same.  See pictures below:
Hole in cupcake

Cheesecake in cupcake

Finished cupcake


Tuesday, September 18, 2012

All about Olivia

Two years ago we were blessed with a little girl whom we named Olivia.  I swore that we would never have a big party for her until she turned five or so.  But I have broken that promise because my husband is getting ready to be deployed over seas therefore we had a big two year birthday party for lit' Miss.
The theme was of course all about Olivia!!    Meet our Little Miss Olivia

Being an Olivia the Pig party everything had to be red, white, and black.  I loved planning this party from decor to food.  For dinner we had Lasagna, Spaghetti, French bread, and salad.  Drinks were water bottles with Olivia labels and pink lemonade punch.  Of course then we had a dessert table which featured Red velvet cheesecake cupcakes and cake, Brownie bits, choc. covered pretzels, sugar cookies, stuffed strawberries, and a small candy bar.
Drink table


Dinner table
 
Dessert table


On the present table I put a framed picture of Olivia with her saying thank you.  In front of the picture we had little goodie boxes for all the adults with mini choc. bars that had cute Olivia labels on them.  Of course we had goodie bags for all the kids who came to the party and I placed them up on the fire place mantel.  Above the goodie bags was a poster that featured one of Olivia's rules of life. "Never miss a very important party".
 
Present Table


Now we move outside where we had tables set up for eating.  We rented a 20X20 canopy and had a fun set up under it.  First we strung up balloons in a diamond shape and then attached Christmas light to them so when it got darker we had light outside.  The tables where set up with lots of love.  I hand made party hats and Olivia rule of life cards.


The last thing I did was made up an activity table inside for the kids.  I had recorded a few Olivia the Pig shows so that was playing on the TV during the whole party.  On the kids activity table we had Olivia books and coloring pages.  Also the kids got to decorate their very own pig sugar cookies.


Happy Birthday to my sweet little girl!!
IN the next couple posts I will talk about the treats and some of the crafts I did for this party.  But this post is just so you can get different ideas for an Olivia the Pig party!!!


Sunday, September 9, 2012

Angry Birds Party

Angry Birds Party for Mr. David Jr!!!
David is my neighbor and he was turning eight and he really wanted an Angry Bird Party.  We talked about what he wanted (and what mom thought was a good idea. :)) and we created the special treats for his party.
I asked him first what was his most favorite dessert and he said he loved Chocolate chip cookies and Oreos.  So I went with those two flavors for the cupcakes.
Then he loved the idea of angry bird cake pops because then they would really look like the birds themselves.
Mom wanted a small cake so he could blow out his candles and have great pictures. 
This was all a great challenge to me because I really did not know anything about Angry birds.  Therefore I had to do a lot of research and then I had the right ideas to move forward.
Here is how everything turned out:


This party was a great day.  They roasted a part of a pig which was so yummy and also had a blow-up water slide.  My little almost 2 yr. old wanted to do the slide like the big kids, but the problem was she had to run, jump, and throw herself down the slide.  She did run but could not jump as that concept has not hit her yet.  She says jump but the feet never leave the ground.  :)  Therefore I had to pick her up and throw her down the slide.  The first couple throws she was not sure about the slide but she never stopped and my arms got so tired but the end of the day. 
The kids loved all the treats and the party was a smash!!!

Sunday, September 2, 2012

Twins? what are you having?

Babies are so much fun and it is the best part of pregnancy when you find out the sex of your baby.  Friends of the family are about to have twins and they asked me to make a reveal cake.  I was so honored with this request.  They had the doctor put what the sexes of the twins where in an envelope and then they dropped it off to me.   This is such a fun idea and I had tons of fun making this cake.
First I made the batter of the cake then split it into half.  
I split half into a fourth and colored to show the sex of the babies.  I had to split this because of having twins, normally you would just color the whole half.  I wanted each baby to have their own color.
Prepare the pans,  I spray the pans with oil and then put a wax paper circle into the bottom. When you are ready to remove the cakes from the pan it will not stick.  
Add the uncolored batter first into the pans.  Then carefully add the colored batter into the center of the pan. 
One pink and one Purple:  two girls :)
 
Bake the cakes, allow to cool, add filling (this one had blackberry jam), and decorate.
 
 
The twins are.........as cute as a button


As you can see they had to cut all the way through and pull out a piece in order to know the sex of their babies.   Congrats to the Letourneau family you are have two girls!!!!

Saturday, September 1, 2012

Key Lime cupcakes


I was asked to make cupcakes for a birthday where the brother is a nurse.  He loves his job and also loves Key Lime Pie, so I had to come up with a key lime cupcake and nursing decor.  These turned out so cute and very, very yummy!!!  The decor is all shaped out of fondant.
I also love Key lime pie so these cupcakes where so much fun to make!!  I rarely try things that I make because I hate sugar once I finish working with it but once I finished making these I ate one right away.  WOW loved it!!  The family I made them for also really liked them and gave me great review on their face book page.
Please enjoy this recipe!
Key Lime Cupcakes w/ cream cheese lime frosting
 
Cupcakes:
1 box of white cake mix
eggs
veggie oil
water
1 fresh lime
Key lime pie filling or pudding
 
1)  Make the cake box mix as the back instructs, then add the zest of one lime and the juice once zested.
2)  Bake the cupcakes and then allow to cool completely.
3)  With a small paring knife carve out the middle of each cupcake.  Put the key lime pie filling into a sandwich bag and make into a piping bag.  Cut one corner and fill in all the centers of the cupcakes.
Now about the filling:  I found a can of pie filling that was very good but there are also key lime pudding mixes you can make.
 
 
Frosting:
1 8oz cream cheese (room temp)
6 tablespoons butter (room temp)
3 cups powder sugar
1 teaspoon fresh lime
Zest of one lime
(you will need another lime to zest over the top of each finished cupcake also)
 
1)  Cream the butter and cream cheese for about 3-5 mins on Med. speed.
2)  Add the lime juice and zest then mix
3)  Add the powder sugar one cup at a time until mixed well.
4) Put finished frosting into a gallon zip lock bag, cut off the corner, and then pipe onto the top of each cupcake.   Add a little extra zest to the top of the frosting!!!
 
Serve or store in the fridge up to three or four days.