Tuesday, May 22, 2012

Sleeping Beauty

         Sleeping Beauty also known as Aurora was born a Princess.  But a wicked fairy put a cures on her as a baby.  Her parents were worried for her so they had her live in a cottage in the middle of the woods.  Three good fairies where put in charge of caring for Aurora.  I made fairy wands out of pretzel sticks covered in chocolate and colored sugar.  As Aurora grew she loved to pick flowers and berries.  Therefore, I made flower sugar cookies and oatmeal berry cups.  Aurora meets a handsome prince in the woods and finds out that she is a princess herself.  The cures does harm Aurora BUT true love saves her with a Kiss.

Fairy Wands
Needed:

Pretzel rods                      
White melting Chocolate
Colored Sugar

How to make:
1.  Follow melting instructions for the chocolate.  But add a little veggie oil to the choc. but for melting.  When you add this oil it helps the choc. have a little shine.
2.  Dip one end of a pretzel rod into the choc.  Using a spoon cover over half of the rod with choc. 
3.  Hold the rod over a plate and use another spoon to pour the sugar over the choc part of the rod.  Place finished rods down on a cookie sheet covered with wax paper.  Once all the rods are done then place in fridge for choc. to harden.

Flower sugar  cookies


Ingredents:  (about two dozens)  Recipe from Betty Crocker's New cookbook
Can of white frosting
any color food coloring
Flower cookie cutter
1 1/2 cup powder sugar                          1 large egg
1 cup butter softened                              2 1/2 cups all-purpose flour
1 tsp. vanilla                                           1 tsp. baking soda
1/2 tsp. almond extract                           1 tsp. cream of tartar

Directions:   Oven 375
1.  Mix powered sugar, butter, vanilla, almond extract, and egg in a large bowl.  Stir in remainder ingredients.  Once finished cover dough and put in fridge for two hours.
2.  Cover cookie sheets with spray oil
3.  Flour work area, rolling pin, and hands.  Split dough in half and roll out 1/4 inch thick.  Use cookie cutter and cut out flowers.  Flour a spatula and lift cut out flower up and place onto cookie sheet.
4.  Bake for about eight minutes.  Remove when edges are golden brown.  Place cookies onto drying rack.
5.  Once cookies are completely cooled, frost.  You can also add colored sugar or any other sprinkles.


Oatmeal berry cups with lemon whipped cream

Ingredients:

          Cookies:   makes about two dozen

1 cup butter, softened                                         1 cup sugar
1 cup brown sugar                                              2 eggs
1 tsp  vanilla                                                       2 cups flour
1 tsp  baking soda                                               1 tsp salt
1 1/2 tsp cinnamon                                              3 cups quick cooking oats

Directions:   Oven 375
1.  Cream butter, sugar, brown sugar for about 2 minutes.  Add one egg at a time and vanilla and cream some more.
2.  In a separate bowl combine: flour, baking soda, salt, and cinnamon.  Stir together and then add to the creamed mixture.  Stir until a dough is formed.  Mix in the oats.
3.  Split dough in half and put each half on a thing of cling wrap.  Roll cling wrap up to form a log.  Place oatmeal logs into the fridge for one hour.
4.  You will need a muffin pan and spray each cup with spray oil.   Once logs are chilled take one out and cut 1/2 inch pieces.  Place cut pieces into the bottom of the muffin cups.  Spray the bottom of a spoon or your fingers and flatten dough in the cup to form a cup.  This will not stay when baking but it does help.
5.  Place in oven and bake for ten minutes.  They will not be done but you will need to take your spoon again and put a dimple in the middle of each cup again to help make a bowl.  Bake another five mins. Press in the middle again with the spoon.  Let them cool in the cups for a little bit and then let them finish cooling on a rack.

            Berry mixture:

You will need:

1 pint of red raspberry's                               
1 pint of blue berries
1 pint of strawberries                                 
1 lemon

Directions:

Cut all berries in half and stir together.  Zest the lemon into the mixture.  Then cut the lemon in half and squeeze 1/2 of the lemon into the berries.
Add the mixture to the cooled cookie cups.

           Home made Lemon Whipped cream:

Ingredients:
1 pint heavy whipping cream
1 lemon
1/2 tsp. vanilla
3 tablespoons powder sugar

Directions:
1.  In an electric mixture add the cream, vanilla, and 2 tablespoons of lemon juice.  Set the mixture on high. 
2.  While the cream is thickening add the powder sugar and zest from the lemon.
3.  The whipped cream will be down when peaks are formed with the cream.  Taste the cream to see if the lemon comes through.  If you feel it needs more add a little more zest and fold in with a spatula.
4.  Put whipped cream into a gallon zip lock bag.  Cut off a corner and pip on top of the berry mixture.  Here is how it should look like when done.

These berry cups where the favorite of the adults at the party.
I hope you have enjoyed all the treats and decor. that went into this great party.  Every child deserve a special day on their Birthday even if it is not this big of a production.


Thursday, May 17, 2012

Beauty and the Beast....Belle

          Belle's father was a prisoner of the wild Beast.  To save her father she promised to remain in the castle forever.  While living in the castle Belle meet Mrs. Potts and her son Chip which I made out of cake pops, then also Cogsworth the clock made from cupcakes.  The beast had a rose that would bloom on his 21st Birthday therefore I made pink chocolate covered strawberries designed to look like a rose.  In the end Belle does fall in love with the Beast and he then turns back into a Handsome Prince.  Belle and the Prince marry and she becomes a Princess.

Strawberry Roses
I cleaned the strawberries and then stuck a Popsicle stick into the end of the strawberry that has the green age.   Take pink melting chocolate and melt as bag instructed.  Dip the body of the strawberry into the choc.  and allow to harden.  Take a Red gel or choc. and pipe on in a circular design.


Cogsworth Cupcakes

Ingredients:
Pre-made cupcakes any flavor                                          
Cream cheese frosting
Light brown food coloring
Black decoration gel
Mini chocolates
Smarties
Tootsie rolls
Pull apart red Twizzlers
Sliced almonds

Assemble the face:
1) Place a little of the cream cheese frosting in a piping bag this will be used for the white of the eyes.  Add a little of the brown food coloring to the rest of the frosting just to have a light tent.  Spread frosting all over the top of the cupcakes.
2)  Place a smartie in the center of the cupcake for the nose.  Make a mouth with the Red twizzlers.  Pipe on some white for the eyes and then add a mini choc. chip for the eye ball. 
3)  Use the black decorating gel for the eye brows and the clock hands.
4)  Place the sliced almond in the center at the top of the head.  
5)  With your fingers flatten out the tootsie roll and then cut in half.  Roll the ends of the halved tootsie as you see in the picture.  Place on the head on either side of the sliced almond.


Mrs. Potts and Chip Cake pops


To make these I dipped the cake pops into white choc. and did the rest out of fondant.  The cake pops where baked with my cake pop maker.   I think when it comes to doing cake pops you must have a lot of time to spend.  The details take a lot of work, but its said hard work reaps great rewards!!


Tuesday, May 15, 2012

Cinderella Treats!

        
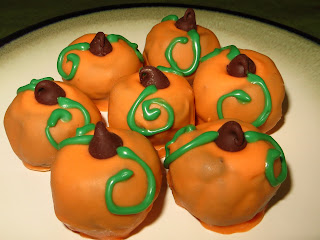
         Treats to fit the story of Cinderella.  Poor Cinderella's father passed away leaving her with an evil step mother and two step sisters.  Her best friends where the mice and birds.  Therefore, I created cute little mice out of Rice Krispie treats.  Her Fairy godmother turned a pumpkin into the carriage that carried her to the Princes ball.   So I made truffle pumpkins.  At the end of the story Cinderella marries the prince and becomes a Princess.  Thus we had ham and cheese sandwiches cut into crowns.


Ham and cheese Sandwiches:
      This was easy to made, I just used a crown shaped cookie cutter.  Also I did not put any wet condiments on to prevent soggy bread.


Rice Krispie Treat Mice:


Things needed:

make a batch of rice krispie treats.
Mini Chocolate chips
Red melting Chocolate
Red Twizzler pull and peel candy

Directions:

1.  Make the batch of rice krispie treats, if you need to know how look at the blog title Princess cakes.   Spray your hands with a little spray oil and make a semi-circle with a handful of rice treat mix.  That means make a ball and then flatten the bottom, then pull a little forward to form the head.
2.  Once all the mice body's are made its time to cut Twizzler tails.  Pull the twizzlers apart and with the single strain cut two inch tails.  Find a hold in the rice treats at the back of the mouse body and push the candy tail in, then push the rice treats round the candy.
3.  Time to put the eyes on, Take the mini choc. chips, press the tip of the chip into the face of the mouse.
4.  The nose is made from melted red choc.  Melt a little red choc. in the microwave for about 30seconds.  Put the melted choc. into a sandwich zip lock bag.  Push choc. down into one corner and then snip off the corner.  Put a small dote on the end of the mouse's face


Truffle Pumpkins:
Ingredients: will make about 25 truffles

1 package of cream cheese softened
1 package of Oreo cookies
orange and green melting chocolate
mini chocolate chips
cookie sheet covered with wax paper

Directions:

1.  Separate all Oreo cookies and scrape out the cream filling.  Put the cookie part of the Oreo into a food processor and grind until finely ground.
2.  In a medium bowl combine the softened cream cheese and ground cookies.  Mix well until a nice dough is formed.  Use a small spoon and scoop some cookie mixture into your clean hands.  Roll into a ball and place on the cookie sheet.  With your pinkie knuckle press a small debit into the top of each ball.
3.  Once all the balls are made place into the fridge for about one hour.
4.  Pour half of the bag of orange melting choc. (can buy this at most craft stores) into a microwave safe bowl and add a little splash of veggie oil.  Place into the microwave and heat for thirty seconds, then stir if not all melted then put in for another 15 seconds.
5.  Have out a small bowl with the mini choc. chips ready to use.
6.  Now time to dip the cookie balls into the orange choc.  You can use a fork, or dipping tools bought at the craft store.  (you will find the tools where the choc. is located)   Dip a ball into the choc. making sure it is completely covered.  Place back onto wax paper with the debit up.  Press a mini choc. chip into that debit with the pointing part upward.  This will make the steam of the pumpkin.  Make sure you do this after each dip so that when the melting choc. sets the choc. chip will set into the melting choc.
7.  Once all the balls have been dipped and garnished with the steam place into the fridge to harden the choc.  Chill for ten mins.
8. Now in another microwave bowl melt the green melting chocolate the  same way as the orange.  Once the Choc. is completely melted spoon into a sandwich bag.  Press melted choc. to one corner and snip off the corner.   At the top of the pumpkins draw on green vines. Once all vines are on chill for another ten mins.
9.  Now the pumpkins are ready to serve.  If not serving right away store in a lip tight container in the fridge.


Crown Ham and Cheese sandwiches

Rice Krispie mice

Truffle Pumpkins

Disney Princess cakes......


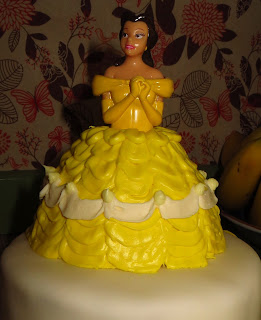
        For our Disney party we featured three princesses: Aurora, Belle, and Cinderella. Each lady was placed on top of a small cake covered in fondant and decorated the same.   I bought the princess tops from eBay.  The body of each lady was made from rice krispie treats.   Here is how each was assembled and frosted.

1)  First I baked three double layered cakes and filled them with different flavors.   Each cake was then covered with a thin layer of cream cheese frosting and put into the fridge to set.
2)  Once cakes had set I covered them with white fondant and fondant decorations.  This part is all done.
3) Now it is time to make Rice Krispie treats for the body of each princess.

                              Ingredients:                                          
                                  1 1/2 tablespoons butter
                                  2 1/4 cups small marshmallows
                                  3 cups Rice Krispies cereal

                                  1 med./large funnel
                                  1 cookie sheet lined with wax paper
                                  1 can cooking spray

Directions:
1.   Melt butter in a large saucepan over low heat.  Once melted add the marshmallows and stir until completely melted.
2.   Put the Rice cereal in a large bowl and pour marshmallow mixer over the top.  Stir together with a spatula until cereal is completely covered.
3.  Spray the inside of the funnel with the cooking spray and also spray your hands.  Stuff Rice Krispie treat mixture into the funnel and pack tight.
4.  Remove molded treat from funnel and place on the wax paper covered cookie sheet.  Take the top of your princess body and make a hole in the top of the treat to fit the body.  Let the treat body's cool and set for one hour.

4)  Once the treat is cooled it is time to take the princess top off and cover the treat with your cream cheese frosting.  Just a thin layer to even the surface for the real frosting job. Place in fridge to allow frosting to set about 1/2 hour.

5)  Time to put the princess on top of your cake: you will need three skewers cut in half and two small pieces of wax paper with a sem-circle cut out of one end.   Slowly push the three skewers into the bottom of the princess with half in and half sticking out.  Then place the princess into the middle of the covered cake and push down.  But before you push it all the way down place the two pieces of wax paper in between the cake and princess. The sem-circle on the inside to go around the stakes.

6) Frosting time!!  The frosting tips you will need will be tip 104 and tip 5, also piping bags.  I am going to go through each princess now alone so you will see and read how to frost them.

Belle

1.  You will need two colors of frosting for Belle, Bright yellow and a pale yellow, each placed in a piping bag with tip 104 on.
2.  Staring with the Bright yellow you will make long ruffles for the dress.  Start at the bottom and work your way up the dress.  I found that if I made one ruffle and then picked up the tip and then began again it made the ruffles look better.
3.  Once the whole dress is done pick up the pale yellow piping bag and do one layer of ruffles in the middle of the dress.  Then place a dote at each connecting ruffle. 
4.  Place the cake into the fridge for the frosting to set before you pull out the wax paper.  It will help to keep the frosting from pulling off if it is hardened.
5.  Pull out the wax paper and your first cake is done!!


 Cinderella
1.  For Cinderella you will need Bight blue, light blue, and white frosting.  The tips needed will be 104 and 5
2.  First you will want to cover the whole dress in a nice thick layer of the bight blue frosting.  With a thin spatula you will drag the frosting from bottom to top to make the pleat in the body of the dress.  After each drag with the spatula clean off the left over frosting on the spatula and begin a new pleat. 
 3.  Fill one bag with a little of the bight blue and another with white frosting add the 104 tip to each bag.  You will do the same ruffle as you did on the Belle dress at the bottom of Cinderella's dress.  Start with the white and do one ruffle. Then do a bight blue ruffle on top of the white.
4.  Fill a bag with the light blue frosting with the tip 5 on it.  You will be making a top poof to the dress, start in the back and pip to the front.  Fill in the middle of the poof doing the same design as the outline.
5.  Place cake in fridge, let the frosting harden before you slowly remove the wax paper.


Aurora


1.  For Aurora you will need bight pink, light pink, and white frosting.  The tip needed will be 104.
2.  Spread a thick layer of the light pink frosting on the body of the dress and follow the same technique as done for the Cinderella princess.
3.  With the white frosting pipping bag made a ruffle to the bottom of the dress.  This ruffle is a stacked ruffle not long like on the other two princesses.  Once done with the white do the same ruffle again with the bright pink frosting.  At the top of the dress you will add two more ruffles with the bright pink frosting.
4.  Once done allow frosting to harden in fridge before you remove the wax paper.

Now your cakes are ready for a wonderful Princess Party!!!


Sunday, May 13, 2012

A Disney Princess Party Ideas

          For the past week, I have been making and molding treats for this little girl's Disney Princess party.  Miss Rylee Anne turned two and loves the Princesses.  Her mom wanted to go big because she was suppose to deploy in the fall.  And Big is what we did, I made all the treats, signs, and a few of the table center pieces.  It was so much fun to be the party planner and designer for this party.  I just cannot wait for My lit' gals Birthday party in Sept.  So what I would like to do over the span of four different blogs is share with you the treats and crafts that went into this party.  I hope that you will enjoy the different ideas and designs that come from this great Party.


Ideas for Decor

The Dessert Table

Home made Birthday signs made from cereal box card board, scrapbook paper, stickers, paint, clip art, and ribbon.

Children's tables

Home made tissue flowers and Princess dolls
Disney Princess 3D paper dolls:
          I found these dolls on  Disney.com, this site of course has all kinds of great ideas for parties.  Once I printed these dolls out on card stock it was time to assemble.  What a task i will tell you, you will need scissors and a hot glue gun.  Follow the instructions and you will have no problems.

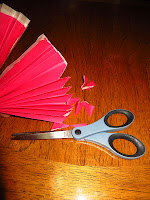
Tissue Flowers:
            You will need:    Two colors of tissue paper, nude color ribbon, and scissors
          Getting Started:   First you will need two pieces of tissue one dark color and one lighter color cut in half.  Stack the dark two sheets on the bottom and the two light ones on top.  Have a piece of ribbon a half a foot long.  Now begin to fold the tissue in one direction, once completely folded hold in half and tie the ribbon in the middle of the fold.   Take the scissors and cut each folded end in an upward diagonal.  Then fan out the folds and starting with the middle fold start pulling each layer upward.   Follow picture diagram below if you need a visual.


Thursday, May 3, 2012

Chocolate + Stawberries = YUMMY!!

A friend came up to me a couple weeks ago and said, "My Birthday is coming up in May and I really want you to make my B-day dessert.  Oh, and by the way I love strawberries."  OK, well I don't really have a dessert that I have ever make with strawberries.  So I began to think....Nothing is better then a fresh strawberry covered in chocolate.   I then remembered that My Hubby's Gram fills whole strawberries with a cream cheese filling.  It hit me make a pie with all these wonderful things together and this is what I came up with.


Ingredients:

1 Oreo pie crust
1 quart of fresh strawberries
1 8oz cream cheese (at room temp)
3/4 cup powder sugar
1 teaspoon vanilla extract
1 teaspoon lemon juice
1/4 cup dark chocolate chips
1 teaspoon veggie oil

Directions:    NO BAKE

1)  Open your pie crust. :)  easy!
2)  IN a mixing bowl beat the room temp. cream cheese until smooth. (I used a hand mixer since there is not much filling to use a big mixer)  Add the vanilla extract and lemon juice, mix for 30 seconds.  Add the powder sugar in 1/4 cup at a time and mix between each time.  Mix until everything is smooth.
3)  Add the cream cheese mixer to the bottom on the pie crust.  Smooth until evenly spread out in the bottom of the pie pan. 
4)  Time to cut those wonderful fresh strawberries.  First cut off the tops and throw those away.  Then stand the strawberry on its cut end and cut into thin slices.
5)  Use all the middle parts of the slices and make an outside rim, with point in and flat side next to the crust.  See picture for the pattern.


6)  To fill in the middle make two layers of stawberries.  To make it pretty make sure the points are all pointing the same way on the top layer.
7)  Place Chocolate and oil in a microwave bowl and heat for 30 seconds.  Stir the chocolate with a butter knife until smooth.  Using the knife drizzle the choc. on top of the pie. 

Enjoy your wonderful Chocolate overed strawberry pie!!!!