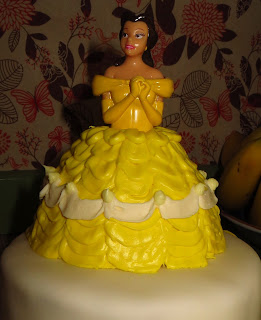
For our Disney party we featured three princesses: Aurora, Belle, and Cinderella. Each lady was placed on top of a small cake covered in fondant and decorated the same. I bought the princess tops from eBay. The body of each lady was made from rice krispie treats. Here is how each was assembled and frosted.
1) First I baked three double layered cakes and filled them with different flavors. Each cake was then covered with a thin layer of cream cheese frosting and put into the fridge to set.
2) Once cakes had set I covered them with white fondant and fondant decorations. This part is all done.
3) Now it is time to make Rice Krispie treats for the body of each princess.
Ingredients:
1 1/2 tablespoons butter
2 1/4 cups small marshmallows
3 cups Rice Krispies cereal
1 med./large funnel
1 cookie sheet lined with wax paper
1 can cooking spray
Directions:
1. Melt butter in a large saucepan over low heat. Once melted add the marshmallows and stir until completely melted.
2. Put the Rice cereal in a large bowl and pour marshmallow mixer over the top. Stir together with a spatula until cereal is completely covered.
3. Spray the inside of the funnel with the cooking spray and also spray your hands. Stuff Rice Krispie treat mixture into the funnel and pack tight.
4. Remove molded treat from funnel and place on the wax paper covered cookie sheet. Take the top of your princess body and make a hole in the top of the treat to fit the body. Let the treat body's cool and set for one hour.
4) Once the treat is cooled it is time to take the princess top off and cover the treat with your cream cheese frosting. Just a thin layer to even the surface for the real frosting job. Place in fridge to allow frosting to set about 1/2 hour.
5) Time to put the princess on top of your cake: you will need three skewers cut in half and two small pieces of wax paper with a sem-circle cut out of one end. Slowly push the three skewers into the bottom of the princess with half in and half sticking out. Then place the princess into the middle of the covered cake and push down. But before you push it all the way down place the two pieces of wax paper in between the cake and princess. The sem-circle on the inside to go around the stakes.
6) Frosting time!! The frosting tips you will need will be tip 104 and tip 5, also piping bags. I am going to go through each princess now alone so you will see and read how to frost them.
1. For Cinderella you will need Bight blue, light blue, and white frosting. The tips needed will be 104 and 5
2. First you will want to cover the whole dress in a nice thick layer of the bight blue frosting. With a thin spatula you will drag the frosting from bottom to top to make the pleat in the body of the dress. After each drag with the spatula clean off the left over frosting on the spatula and begin a new pleat.
3. Fill one bag with a little of the bight blue and another with white frosting add the 104 tip to each bag. You will do the same ruffle as you did on the Belle dress at the bottom of Cinderella's dress. Start with the white and do one ruffle. Then do a bight blue ruffle on top of the white.
4. Fill a bag with the light blue frosting with the tip 5 on it. You will be making a top poof to the dress, start in the back and pip to the front. Fill in the middle of the poof doing the same design as the outline.
5. Place cake in fridge, let the frosting harden before you slowly remove the wax paper.
 |
| Aurora
|
1. For Aurora you will need bight pink, light pink, and white frosting. The tip needed will be 104.
2. Spread a thick layer of the light pink frosting on the body of the dress and follow the same technique as done for the Cinderella princess.
3. With the white frosting pipping bag made a ruffle to the bottom of the dress. This ruffle is a stacked ruffle not long like on the other two princesses. Once done with the white do the same ruffle again with the bright pink frosting. At the top of the dress you will add two more ruffles with the bright pink frosting.
4. Once done allow frosting to harden in fridge before you remove the wax paper.
Now your cakes are ready for a wonderful Princess Party!!!


No comments:
Post a Comment