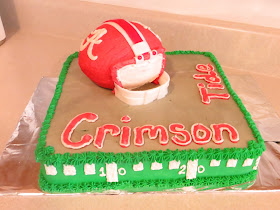
Who do you cheer for during football season?? College team? NFL? This cake can be made into any favorite team.
Things Needed:
Square cake (two layers with filling in between)
Circle cake
Butter cream frosting
Fondant
Piping bags and tips 2 and 21
Food coloring green and fav. teams colors
(the picture is the two pans I used)
Time to start building our cakes:
1. Bake cakes and allow to cool. Add a filling to only the square cake make sure to level off each layer before adding the filling. The circle cake you will need to make sure to level the flat sides add butter cream and push together. Then on the bottom of the circle cake cut off a small piece so that it will lay flat. Put into the fridge to have the frosting set.
2. Pull out the circle cake and put a nice layer of white frosting around the whole circle return to the fridge.
3. Time to mix frosting: Green for the field and then two colors for the team.
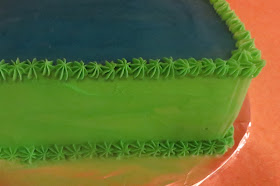
4. Square cake out now: Take one team color and cover the top of your cake. Make use to use a good layer of frosting. Then go to your green frosting which will cover the four sides. Smooth out both top and sides well.
This second picture shows the tools you need to make a smooth butter cream cake. The glass of water is filled with HOT water. Place the frosting spatula into the hot water wipe water off with a paper towel. Start with the top of the cake by running the flat edge from one side to the other side. Clean spatula and return to the water. Repeat until top is smooth. Then start with your sides to smooth them out.
5. Fill your piping bag with tip 21 with green frosting. Create a boarder around the base of the square and the top edge.
6. Fill your other piping bag with tip 2 with white frosting. It is time to make the markings for the football field. Make three or four short rectangles and fill in completely. Then make a long rectangle and fill in once again. Repeat around the whole cake. Then on the long rectangles you will make the yard makers starting with 10 going to 50 counting by ten. Place into the fridge to allow to set, 20 mins. will work.
7. Now is the time for fun......or.......stress. :) Remove both cakes from the fridge. Look at a picture of your fav. team's helmet to see how the colors should go. Begin to frost the base of your circle first, until you hit the half way line. Now be careful you want to leave white at the front of the helmet where the face would be. Once the bottom half is frosted and smoothed over carefully place onto one corner of the square cake. Cover the top half of the circle but remembering to leave the face open. I then put that same frosting into the corner of one gallon zip lock bag, cut off the corner, and piped an edge around the opening for the face. Place cake back into the fridge for five mins. Once the five minutes are done its time to add a little detail work to your helmet. Use a paper towel and carefully press about the colored part of the helmet. This will give it a texture and used helmet look.
8. Fondant time: You will want white and what ever other color the team has. I will be saying white or blue as this cake is the Dallas Cowboys cake.
Knead your fondant till it is workable. Start with your blue. Roll out a long skinny piece for the stripe of the helmet. Measure a one inch thick piece and cut evenly. Start at the front of the helmet and center the stripe all the way to the back. If you have extra cut it off and tuck it under the helmet.
9. Also because the Cowboys have a star on their helmet I used a fondant cutter to make two stars for both sides of the helmet. Using piping bag with the #2 tip I outlined the star.
Now time to work with the white but set a side a tiny bit of blue to create two little buttons. Knead out the white and roll just as you did for the blue. This time cut out a 1/2 inch stripe to center in the middle of the blue stripe. Then measure a one inch by 1/2 inch rectangle, place piece on the front of the helmet where the frosting and fondant meet. Cut out two small latches with one rounded end (look at picture below) Add those two small blue buttons to the latches and place on the cake. (tip: use a paint brush and water to help fondant to stick to each other) Once I had this part of the helmet done I took a little mixture of water and edible glitter and painted the fondant work. If you look closely to the picture you will be it shine.
10. LAST fondant step: The face piece to make the helmet look like a helmet. :)
Cut out two 1/2 inch strips of the white fondant. Work with one piece to create a semi circle and place both ends into the cake. I then add a little piped frosting into the inside of the strip to help it stand. Place into the fridge to help it stiffen a little (ten mins. at least).
Now place the other 1/2 inch strip on top of the bottom strip and once again add a little frosting to the inside.
Time to do your last cut, you will need two 1/4 inch thick pieces that are a little over an inch long. Place these onto the front of the face piece and fold the extra over the top. (look at picture below) Place into the fridge again to help fondant to harden.
11. Now decorate the cake with "Happy Birthday", the teams logo, the teams saying, or whatever you would like it to say!!! Then present and serve!!! Happy Football season to everyone!!!
This blog is all about homemade goodness. These will range from sweet treats to creative crafts. So enjoy!!
Tuesday, August 13, 2013
Tuesday, August 6, 2013
Tangled Cake fit for a princess
I love how this cake turned out but let me tell you I had many sleepless nights trying to decide how to design the tower. I ended up making it out of Rice Crispy Treats so that it would be strong and sturdy.
Things needed to create this cake:
Baked cake ( you will need two different sizes of pans to make the two tiers. Bake two cake levels for each tier)
Butter cream
Rice treats
Wooden rods
Forms to create tower pieces, a cylinder, cube, and cone
Sugar flowers and butterflies
Purple fondant
Bake your cake layers and allow to cool completely. Build your layers by filling the centers with a filling and put a layer of frosting around the layers. Place the cakes into the fridge so that the cake and butter cream can harden up (at least for an hour)
These are the two levels with the filling showing. I added fun colors so when the cake is cut into the colors would show.
While the cake levels are setting in the fridge begin making your rice treats. I found different forms in my kitchen to create the shapes I needed. I used a funnel for the top of the tower, a square lemon dish for the tower body, and a tall skinny glass for the tower. Once your Rice treats are mixed press them into your forms and place into the fridge for at least 30 minutes.
You will need four wooden rods to make sure the cake and tower remain standing. Start to build your cake: Stack your cake tiers, then center the cylinder rice treat on the top, run two wooden rods down the center of the rice treat and cake tiers, add a little frosting to the top of the cylinder treat, add the square treat, add frosting to the top of that treat, add the cone shape treat on top, and finish by running two more rods down the center of all the treats.
Place this stage back into the fridge for 10 mins.
Time to start frosting your cake. Start to create the colors of frosting you will need. For the cake tiers you will need a med. green and a lighter green. The tower you will need pink, dark brown, yellow, light brown, and white.
You will want to frost the tower first before the cake tiers. Start from the top to the bottom.
Cone: frost with white because you will be adding fondant circles later, make sure to cover to make it smooth
Cube: frost pink make it thick enough to not tell its rice treats under. Smooth well on all four sides and square off the corners as best as you can
Cylinder: frost yellow but add a little light brown to give it a stone look. This level does not have to be smooth as you are going for a stone look and texture.
Cake tiers: use the light green to cover both tiers and smooth out as best as you can
The picture above does not follow the color formula I just laid out. But I did this first and then had to change it. So this is a lesson learned for me as well. :)
Add to the fridge again to allow this layer of frosting to harden.
You will now start to decorate your cake. I started from the bottom and moved upward to the top of the tower. Use the med. green frosting to make the vines and leaves Two piping bags are needed: one with tip 2 and the other with tip 67. Tip 67 is for leaves which you will want to make a boarder of leaves on the bottom tier. Then begin to create vines and add leaves here and there. Once both tiers are designed add sugar flowers and butterflies.
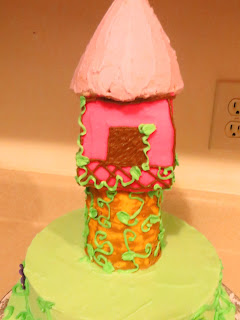
Now it is time to move to the tower. This will take patience so move slowly. Add your dark brown frosting to a piping bag with tip 2. Create the detail on the body of the tower: a window on each side, railings, and a boarder. Then add vines, leaves, and small sugar flowers. In one window you will want to make Rapunzel.
I used white frosting to create her face and little hands. Added a little pink for her lips, dark brown for eyes, and yellow for her hair.
Great job!! You are now to the last big step Purple fondant work.
You will need a very small circle fondant cutter. Roll out your purple fondant and begin to cut out a ton of circles. Start at the bottom of the cone and work around the circle. Each layer should start in a stacked look as it looks like in the picture below.
I added sliver edible glitter mixed with water to give the fondant a pretty look. Add a few vines and flowers to the top of the tower. Done!! Place in the fridge to harden the detail work.
Now you have a Tangled cake that any little girl would love as her own!!!


